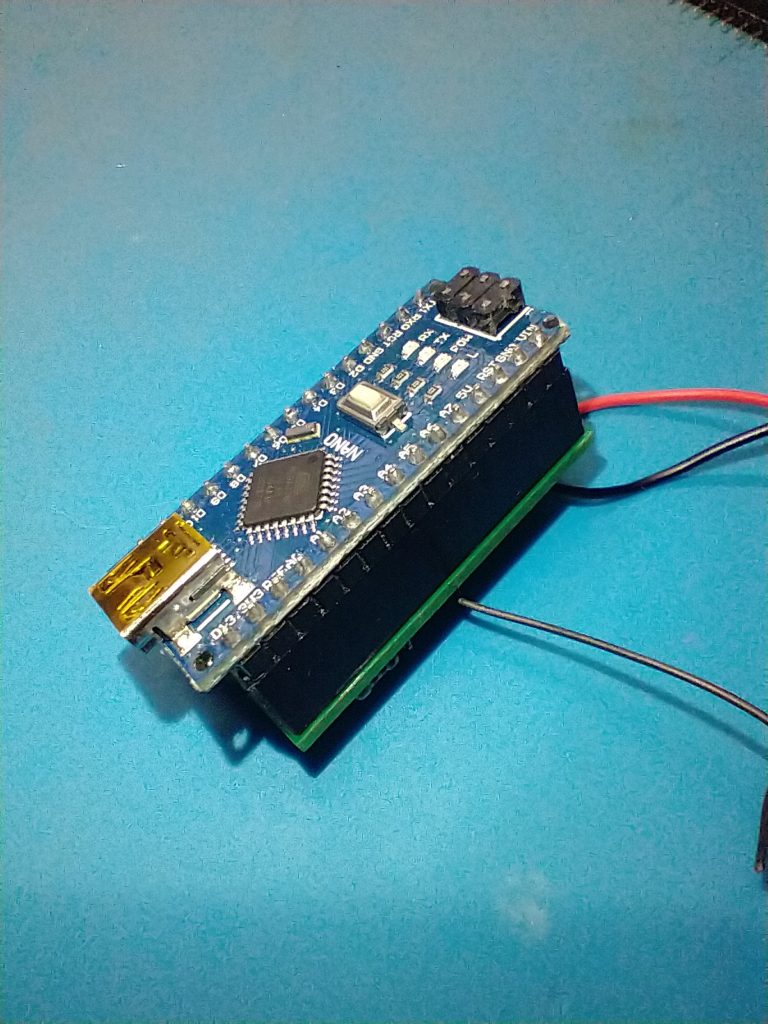
July 3, 2022

Building an improved Baby T-hunt transmitter

The above circuit board is a transmitter controller that fits on to the Arduino Nano board, and normally connects with a three conductor wire to a radio transmitter for the purpose of keying a transmitter for transmitter hunting purposes.

Those connections were Ground, PTT and transmit audio.The Arduino Nano uses the same sketch or instruction set that is written to control an Arduino Uno.

This is before adding the TCXO.


PARTS:

Arduino Controller board, Arduino Nano, 1uf ceramic capacitor, 19″ wire for the antenna

The heart of our project is a small SMD TCXO that has been ordered from DIGI-KEY, description is  XTAL OSC PROG XO CMOS 3.3 25PPM, Part #510CBA-BAAG-ND, ordered on the frequency of 146.565Mhz. The device is manufactured by Silicon Laboratories Inc.

The last time I ordered these were in June 2020, ten units cost about $6.40 each, so no telling what they cost now.

I do still have 6 units for anyone that wants to build a baby constant-on practice oscillator or this Frankenstien unit presented here.

The controller boards for the Arduino Nano is available from Andy KJ7RFN for $13.00 with more information here…https://wb6amt.com/arduino-nano/


The Arduino Nano:

As you can see, the Arduino Nano has all the connections for you to use all of it’s functionality, its actually quite a powerful mini-controller not to be confused with a mini-computer like a Rasp Pi.

What are we doing?

The controller board normally keys the t-hunt transmitter’s PTT connection.

What we are going to do is eliminate the onboard PTT keying relay and build a 3 volt supply for the TCXO and provide the ground to the TCXO by way of the PTT keying transistor on the controller board.

The nano provides transmit audio to the transmitter and the PTT keying is accomplished by the programming data we entered using the Arduino IDE program, On-time…Off-time and also the CW callsign that it will send during the transmit time on. Modifying circuit boards to give a project a head start has always been one of my favorite ways to homebrew stuff.


The Arduino Nano has to be partially assembled, that is the dip-header pin strips have to be soldered to the board or wires can be used depending on your particular project, the rest of the board has all of the components already soldered.

Lorem ipsum dolor sit amet, consectetur adipiscing elit. Ut elit tellus, luctus nec ullamcorper mattis, pulvinar dapibus leo.

ARDUINO NANO:

The Arduino is one of the easiest mini-controllers I have ever worked with, they are very inexpensive, I have bought units online for as low as $3 (knock-offs but worked just fine).

The open-source Arduino Software (IDE) makes it easy to write code and upload it to the board.

This software can be used with any Arduino board.

PRPGRAMMING:

The IDE is a small download to write the instructions you want the Arduino to perform. I can provide a sketch with your callsign and any different timing requirements.

My current sketch has an On-time of 37 seconds and an Off-time of 30 seconds.

The reason for the additional 7 seconds is that the Arduino doesn’t stop transmitting until the entire message is sent, in this case “DE WB6AMT BEACON” is sent three times at 20wpm.

Different message content will affect how many times the call sign or message is sent during the On-time.

Goto www.arduino.cc for the download and plenty of info about the Arduino IDE and products.

The finished project:

Your imagination is is the only limit to how or where you will use this Baby T-hunt Transmitter.


And our completed project installed in its new enclosure ( hidden key rock for a spare key to your house) waiting for the battery to be connected and hidden on the bottom.

It was noticed that two “AAA” batteries can actually fit in the rock if soldered together but a battery holder is too big.I’ll let you folks know who well this little rock does on the next transmitter hunt that I’m hiding on.


Until next time….happy building…

73

DE WB6AMT Earl